Gearing Up For Christmas
Wow, the Christmas season is upon us again – I can’t believe another year is almost over!
We worked hard this weekend to get the Christmas decorations up and we’re almost done; of course NONE of the outdoor light strings worked out of the box this year so I still have to get those up but otherwise we’re set.
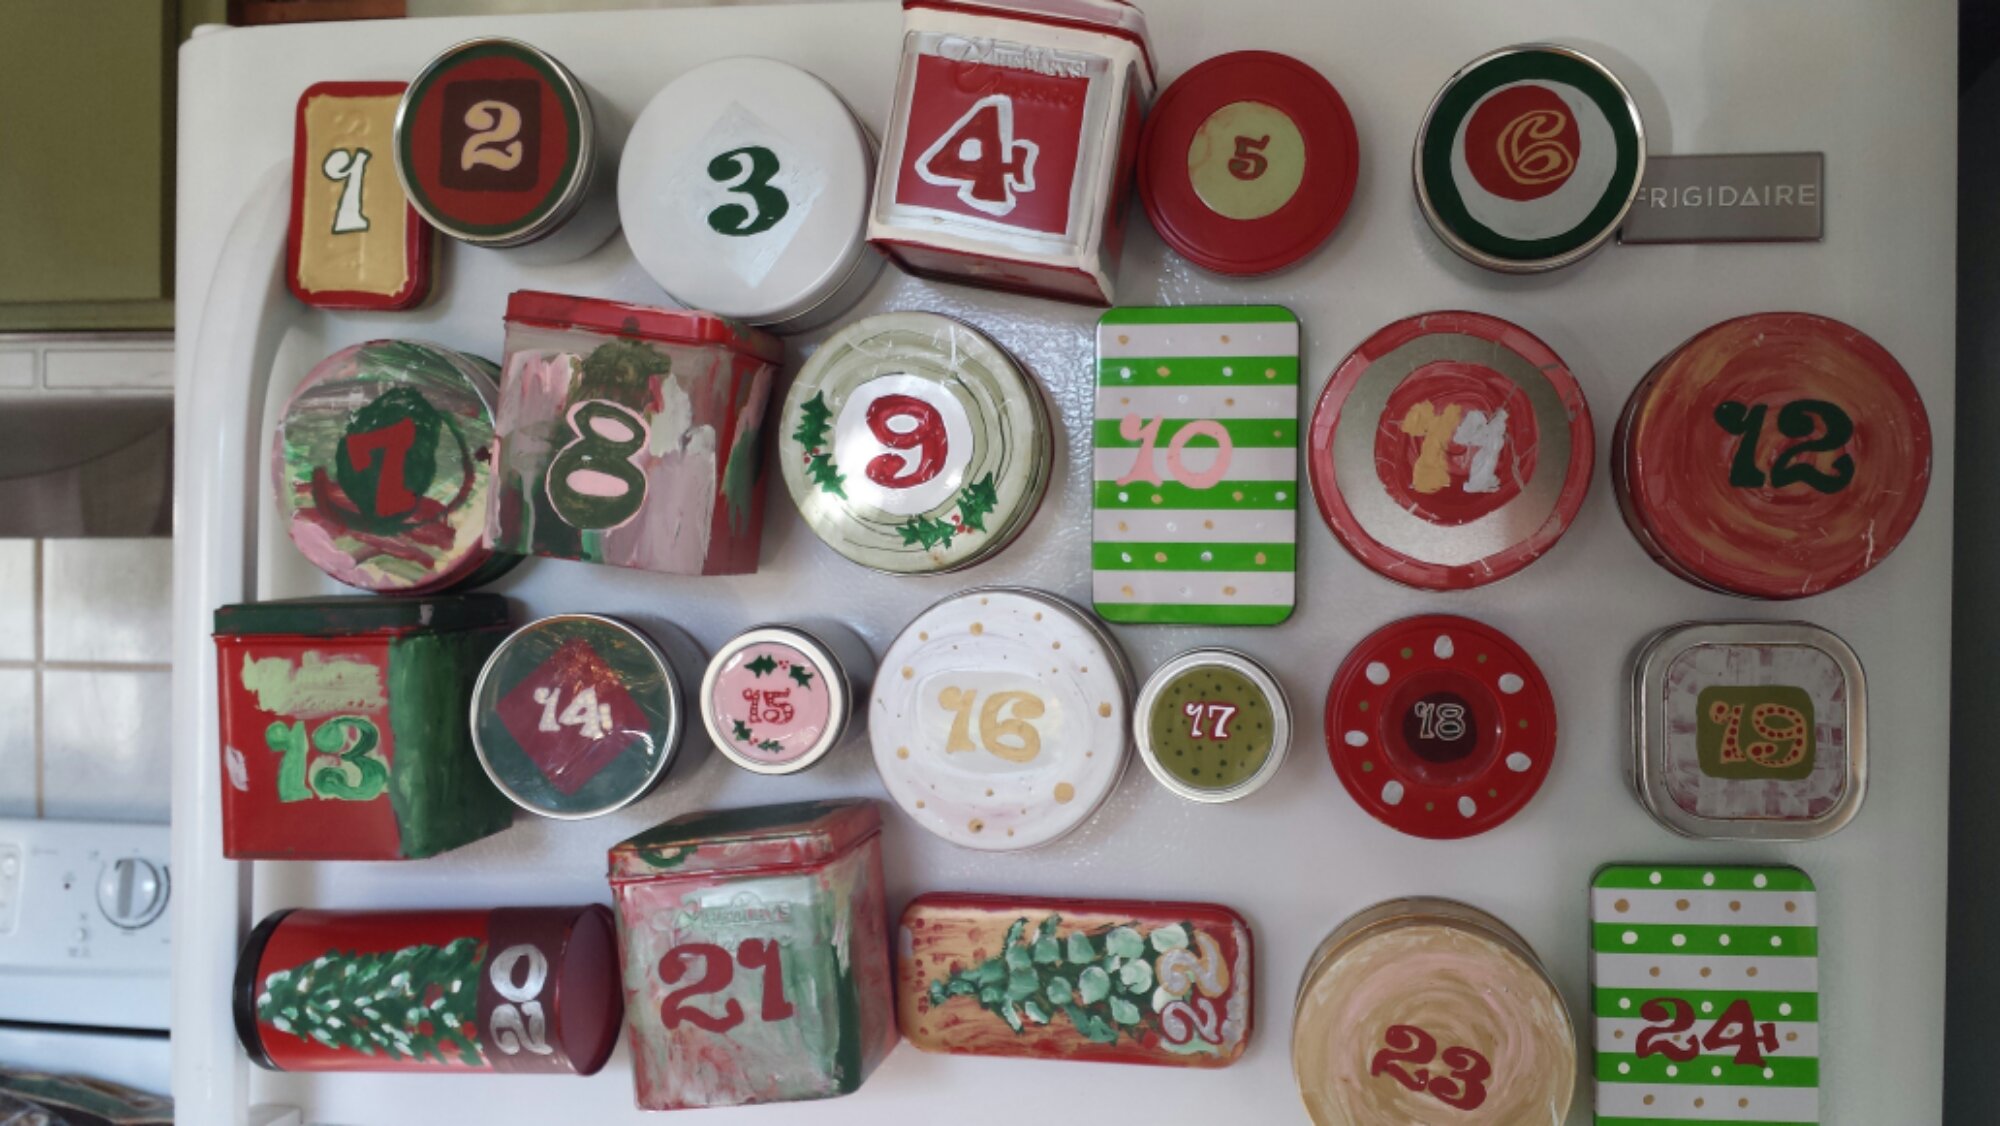
We started our advent calendar on Sunday – we made one a few years ago using assorted tea and candy tins and it attaches to our fridge with magnets.
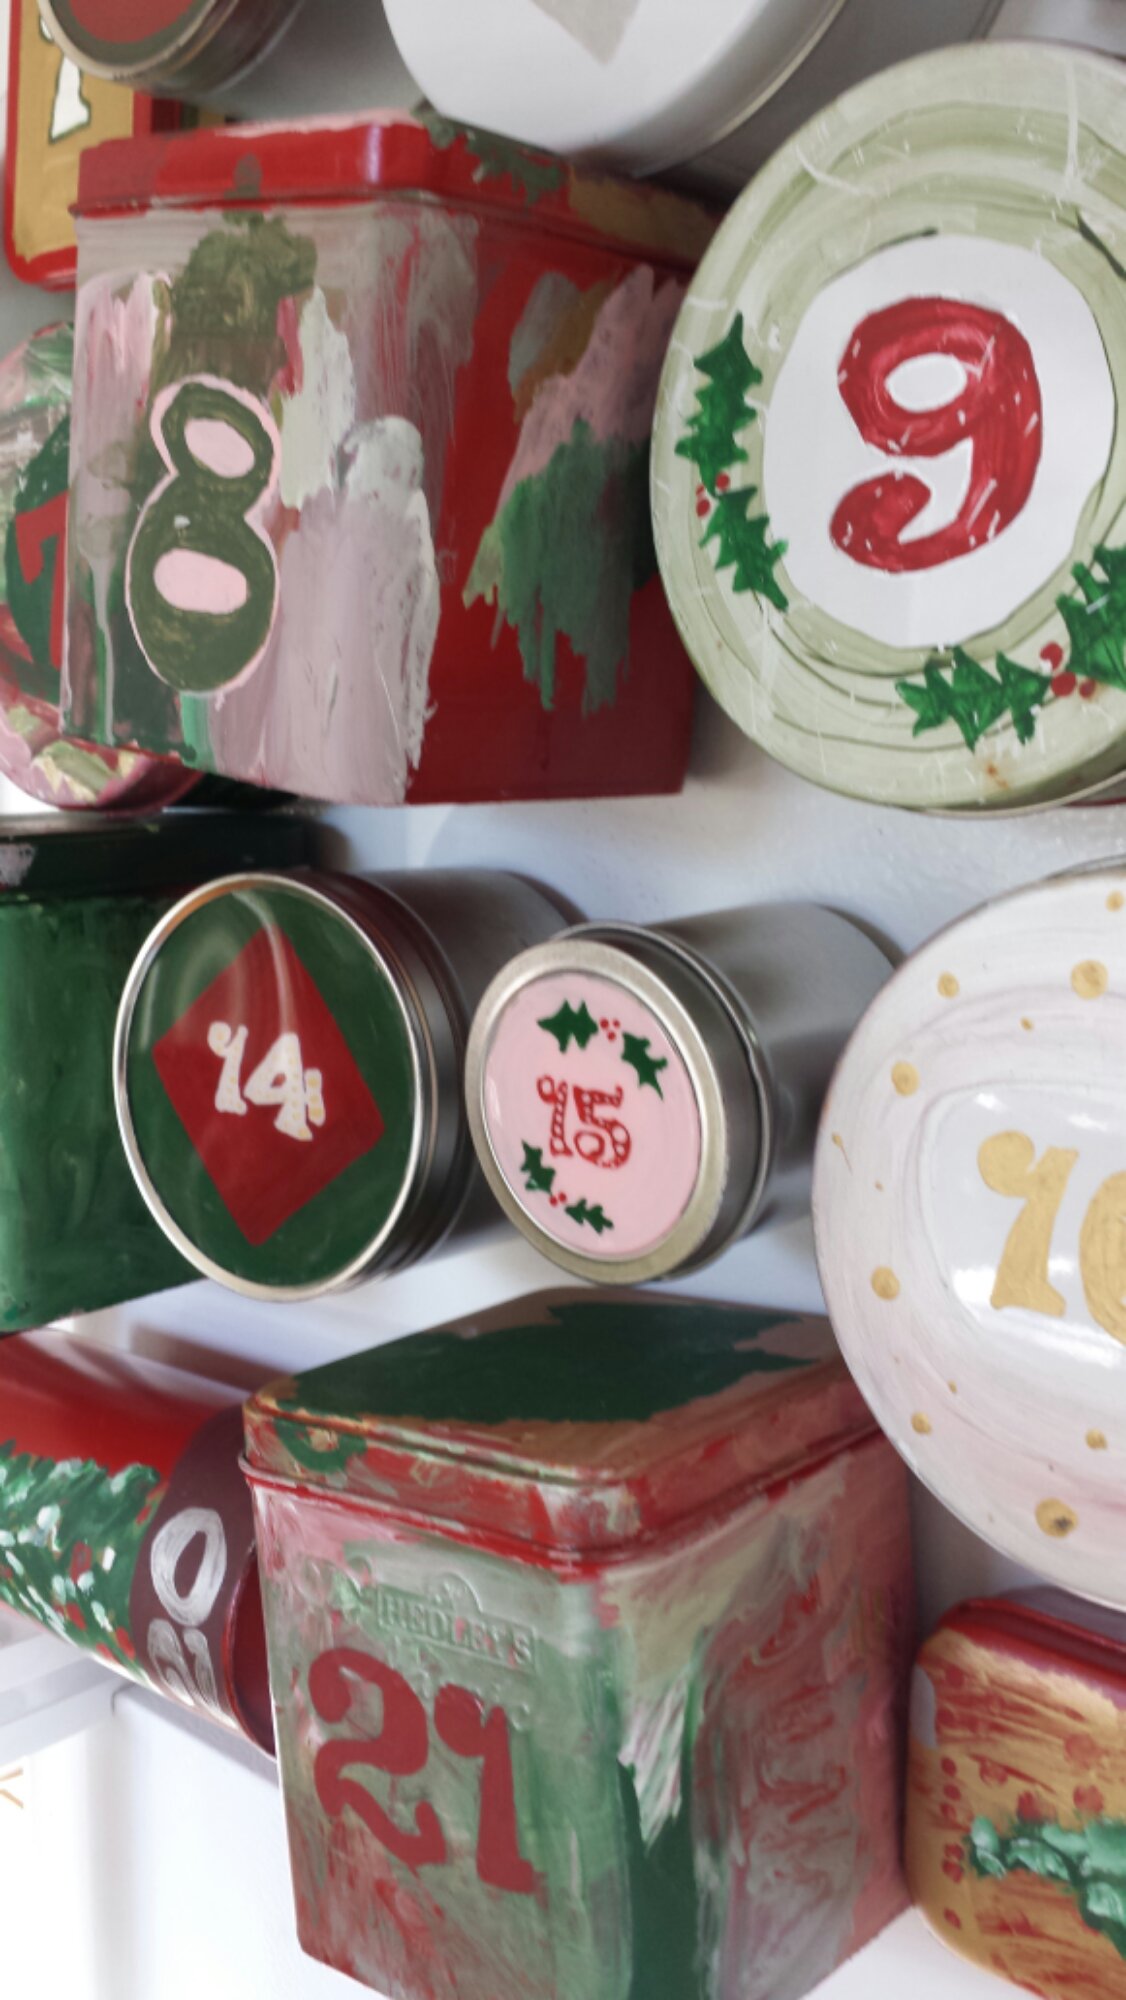
I fill it with a mix of candy, little gifts and notes about any fun Christmas experiences we have planned for that day. I also include a few larger gifts in the advent (holiday pajamas, a holiday movie, a new book) which they find via scavenger hunt clues. The kids absolutely love the clues, but by the end of the month it does get hard to think of good hiding spots – plus I didn’t do myself any favors by starting with rhyming clues, so it’s expected now.
I’m not sure what homemade gifts I’ll do this year but I usually like to do at least something little for people so I’ve got to get on it. Are you making any gifts this year?
Family’s Comin’ Over: A Thanksgiving Playlist for Everyone

I love making playlists – I absolutely love it. I could stay up until the wee hours of the morning the night before a party or holiday working on the perfect playlist, but luckily this year I’ve got my Thanksgiving playlist done a week ahead of time. We’re spending Thanksgiving with some immediate and extended family so I wanted music that would be fun and accessible for everyone invited.
You’ve got to check out the funky version of This Land is Your Land from Sharon Jones, and one of my favorites for the kids is Gobble Gobble by Nooshi. Of course for our family Thanksgiving we couldn’t go without a bit of latin flair, so there’s Bien Sabroso from the great Pancho Sanchez and Sweet Tater Pie by Mongo Santamaria. I could listen to Take My Hand by Ben Harper with the Blind Boys of Alabama all day long, and Jack Johnson’s Home hits me right in the heart. Finally, what Thanksgiving playlist wouldn’t be complete without Everytime You Go Away by Paul Young from Planes, Trains and Automobiles – that’s required viewing every year!
If you’ve got a favorite Turkey Day song I’d love to hear it – maybe it’ll make it into next year’s rotation! Check out the complete playlist below (all 32 songs – that’s 1 1/2 hours of music for your listening pleasure) on iTunes.
The iTunes link above is an affiliate link and if you purchase music I’ll receive a small commission and be ever so grateful!
I’m sharing this post at some of these great link parties – check ‘em out!
Microblogging with Amazon Grocery at IFBC
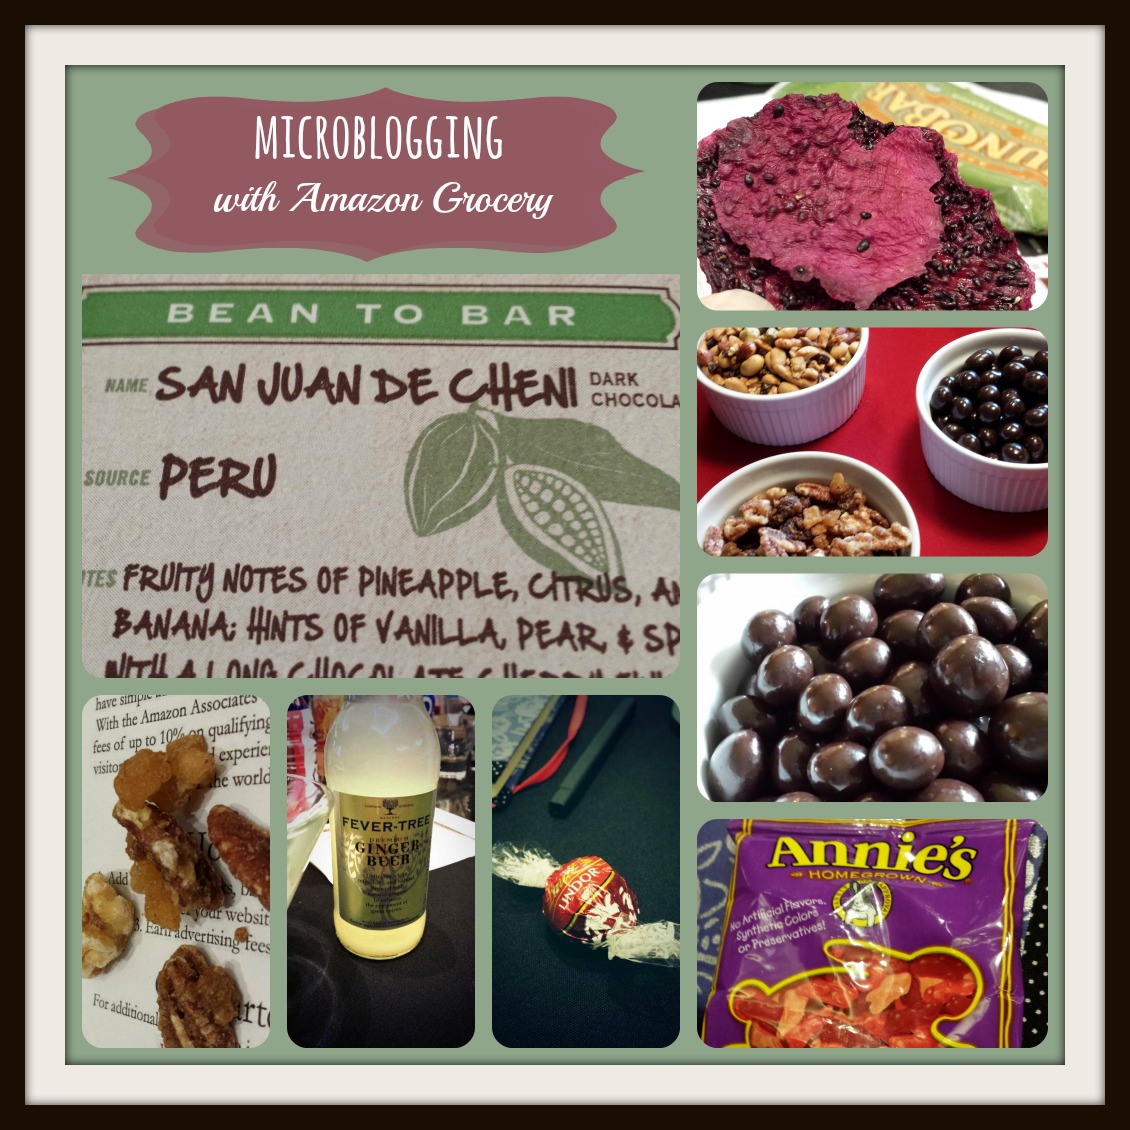 Clockwise from large image: Scharffen Berger Single Source Peruvian Chocolate, Navitas Naturals Dragonfruit Slices,
Trio of yummy IFBC swag snacks, Brookside Dark Chocolate Acai + Blueberry, Annie’s Organic Fruit Snacks,
Lindt Chocolate Truffle, Fever Tree Ginger Beer, Sahale Snacks Glazed Almonds & Cranberries.
Simple Curried Butternut Squash Bisque

Butternut Squash Bisque is one of my favorite soups, and luckily it’s super easy to make. I’ve been making it for about ten years now, ever since we went to spend Thanksgiving at the beach with my family and I set out to find the perfect squash soup to bring along and share with them. After a lot of testing I came up with this recipe, which is very versatile and easily adapted. This soup is so easy and comforting – perfect for a dreary fall day, silky smooth and creamy even without dairy.
Curried Butternut Squash Bisque
Ingredients
1 butternut squash
1 red onion (large, about 2 cups chopped)
1 TBS olive oil
2 TBS curry powder
1 tsp kosher salt
3 cups water
Directions
1. Preheat oven to 400°F.

2. Slice the squash in half lengthwise, empty out the seeds from the hollows and place face down on a baking sheet lined with parchment paper or tinfoil (to make cleanup easier). Bake for about 40 minutes until the squash is soft when poked with a fork. Remove it from the oven and when its cool enough to handle scrape out the squash from the peel and set it aside.

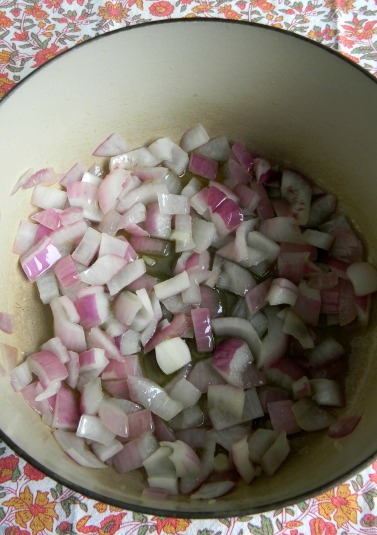
3. Chop the red onion into pieces (since you’ll be pureeing the soup later you don’t need to worry about having a neat uniform dice).
4. In a heavy soup pot (I like to use a dutch oven) heat the olive oil over medium high heat, then add the onion and salt and saute until the onion has softened and started to brown.
5. Once the onion is cooked, add the curry powder and cook for a minute or so, stirring so it won’t burn.

6. Next add the squash and the water, stirring well. Allow the soup to boil gently for a few minutes – since everything is already cooked you don’t need to cook it too long at this step though. You might need to add more water, depending on how big the squash was to start.
7. Now you need to puree the soup. I love using an immersion blender for this, because you can do it right in the pan while the soup is still quite hot. If you’re using a regular blender you might want to let the soup cool down some so you don’t blow the top off the blender (ask me how I know this). Return the soup to the pot, heat it up again and you’re done!

Now this is the simple, easy, straightforward version – here are some ways to adapt it to make it even better:
- The recipe as written is vegan, but it tastes great if you use chicken stock instead of water.
- When you roast the squash, try chopping the top off of a head of garlic so the cloves are exposed and sticking it under one of the squash hollows to roast – when the squash is done you’ll have a head of mild, nutty creamy roast garlic that you can squeeze right into the soup when you add the squash.
- Use a bit less water and add a half cup or so of coconut milk to the soup – you’ll have Curried Coconut Squash Bisque.
- Add a small can of diced green chiles before pureeing, or saute a mild chile along with the onions for a spicy kick.

A Spooky Spiderweb For Halloween: Easy Halloween Yard Decorations

For years my Halloween decorations consisted of a few carved pumpkins and the fall leaves I hadn’t managed to rake out of the yard yet, but as the kids have gotten older they’ve goaded me into more and more decorations. Thus the pumpkins were joined by a skeleton, and a ghost, and a few ceramic pumpkins. This year we took our display up a notch, moving it from the front porch out into the yard with our giant spider web. This web is so easy to make – as long as you’ve got a tree or large bushes to use as an anchor it goes up quickly (and cheaply)!
Start by stringing the support/scaffolding lines of the web. I used regular old jute garden twine (I have a spool that I bought like 10 years ago and it’s seriously never ending – I don’t know what I have to do to use this stuff up). String up 5 support lines – 4 diagonal crossing lines and one vertical line that all meet in the middle. I secured the lines to branches of our big oak tree across the top, and to metal stakes (just big nails, really) stuck into the lawn on the bottom. If you don’t have branches in quite the right spot you could string a line across the top to start with. Start with your outer diagonals, then the two inner diagonals, then use the vertical line to join them all together in the middle by wrapping it once or twice around the other lines where they meet.


Next, start your spiral. I started on the outside and worked my way in, but you could go the other way as well. Try not to make it so evenly spaced, that will make it look more natural. I pulled off a large piece of twine and started wrapping it through the support lines, giving it a turn or two at each line to hold it in place. Tie it off at the end and start another line (it was too unwieldy to pass the whole spool through the web, but if I’d had a smaller spool that would have been the easiest thing to do).

Finally, add a spider or two for that final creepy spooky touch (these were from our local pharmacy – nothing fancy but they look great on the web). Our house is ready for Halloween! Of course we only get about 5 trick-or-treaters a year, but we’re ready for them all the same. Do you decorate for Halloween? What’s your favorite decoration? And, full size or fun size?

International Food Bloggers Conference 2013: A Lighthearted Best Of List

This past weekend I attended the IFBC (International Food Bloggers Conference) in Seattle, and while I’m still digesting (hah!) the things I learned there, I thought I’d post a personal “Best Of” list of my weekend at the conference. Stay tuned later this week for more posts about this inspiring event.
Best Thing I drank at IFBC: Sipping Caramel with Mescal from the good folks at Hot Cakes was unbelievable – so good!
Best Overall Event at IFBC: The Urbanspoon Secret Supper I had at Luc in Madison Valley was the highlight of the weekend – the company was fabulous, the food was exquisite and Chef Thierry Rautureau was an absolutely welcoming and charming host.
Best Quotable Quote of the Conference: “The quality of the wine is twenty percent where you’re at, twenty percent who you’re with, and the rest is the wine” – John Sarich, Chateau Ste. Michelle Winery Culinary Director.
Best New Beverage Discovery: Fever Tree Ginger Beer from Fever-tree Drinks.
Best Snack Food: The paper thin dried fruit from Simple & Crisp was beautiful and delicious; just begging to be set out on a platter with cheese and something sparkling at a party.
Best Piece of Swag That I Thought Were Earrings (But Were Actually Wineglass Charms): Adorably dangly chateau wineglass charms from Chateau Ste. Michelle Winery . In my defense, I didn’t actually try to wear them and they are made with earring hoops.
Best Bit of Pre-Conference Advice: Keep a bunch of business cards tucked in behind your conference name-tag for quick access. The night before IFBC I met Heather from HeatherLikesFood.com at a reception and she gave me this tip which I implemented first thing Friday – Thanks Heather!
Best Aha/D’uh Realization: Everyone has a blog, and everyone likes talking about their blog, so asking someone to tell you about their blog is a no-fail conversation starter.
Disclosure: This post was written in part to take advantage of the IFBC discounted rate for bloggers – but all opinions are my own! For more information about the IFBC blogger program, check out the Registration page from this year’s conference.
Watercolor Paintings with Black Glue Outlines

Another one of our summer projects, inspired by a project from my daughter’s school art program – watercolors with an outline of black glue. This gives the picture the appearance almost of stained glass, and keeps the colors from bleeding over the lines. I loved doing this project and the kids did too! It takes a bit of prep work, but it’s worth it.
Start by preparing the glue. I used regular Elmer’s school glue for this and it worked fine – probably any white glue would work. Pour all the glue out of the bottle into a disposable bowl and add black paint. I used a liquid craft paint, but I think powdered tempera paint would work much better to keep the glue’s consistency. Once the glue is tinted black (it can look dark grey and will still dry black) carefully add it back to the bottle and put the lid back on.

Next sketch out the image you’ll be painting on watercolor or other stiff art paper with a pencil. Try not to use too many lines – now is not the time for careful shading. You’ll add shading and detail to your picture with the watercolor paint.

Once your picture is drawn in pencil, go over the lines with the black glue, using light pressure to avoid big clumps or blotches of glue. At this point you’ll need to let the glue dry, and depending on how thick and dark the lines are it might need to dry overnight.

Now comes the fun part. When the glue outline is dry, use watercolor paints to finish the image. You can see it looks great with vibrant or muted colors.

Tilapia with Quinoa Mango Cucumber Salad

This was a fun meal to make – my daughter helped me make the salad and the whole time she kept commenting on how beautiful the produce was, how delicious the cucumbers and mangoes were, and how I had to be sure to post this on my blog because it’s such a yummy salad.
It’s always so gratifying when anyone likes what you cook, isn’t it? Especially when it’s your child, who has emerged from the picky preschooler years into a much better eater. Of course my son is right in the midst of not eating anything that doesn’t have a face (he’s a total carnivore) so he turned his nose up at the salad. Someday he’ll eat it though, I’m sure.
This was a total throw-together salad, so there aren’t hard and fast measurements for it – here’s how I made it. Cook 1/2 cup quinoa according to the package directions while you chop the other ingredients. Cut up a mango (I like to use a slightly underripe one so it’s a bit firmer and not quite so sweet), an avocado and an english cucumber into cubes, and dice half a red onion. Juice two limes into a salad bowl, add some olive oil (a few glugs), a generous pinch of kosher salt and some grinds of black pepper and beat it all with a fork to combine it into a dressing. Add the veggies to the bowl, stir them around and let them marinate while the quinoa cooks. When the quinoa’s done, add it to the veggies in the bowl, mix everything up and then chill it in the fridge until you’re ready to eat.
I served the salad with a sauteed filet of tilapia, seasoned with salt, pepper, garlic and cumin – of course the kiddos eat that like candy so all in all a successful meal.

Wild Lime Iced Tea Cooler

Aaahhh, the end of summer is here. We’re enjoying this last official summer weekend, working in the yard, playing outside, riding bikes and grilling. The weather is beautiful – deep blue sky, no clouds, and yet not too hot to spend the day outside.There’s something so bittersweet about Labor Day Weekend though. The kids are back to school next week and fall’s around the corner but I’m not ready to say goodbye to summer yet.
Well, we can’t stop time but we can make the most of the time we have, so we’re outside as much as possible and eating all our summer favorites this weekend. We’re also enjoying a great refreshing beverage I came up with earlier this summer – Wild Lime Iced Tea Cooler. It’s perfect for a day in the garden and non-alcoholic so you can drink it all day long with no problem.
Start by making a batch of tea – I make sun tea using a bit less than a quart of water (you want to leave room for the lime soda) and about 5 teabags (whichever black tea you’d like to use – I use Lipton) in a pitcher set out in the sun on the patio for 20 minutes or so. Sun tea always reminds me of my mom and my childhood summers so I brew iced tea that way, you could of course brew it with hot water and then let it cool. Once the tea is brewed, add some ice, a cut-up lime, and a bottle of Dry Wild Lime Soda. I love this stuff – it’s not too sweet and doesn’t have anything artificial added. The soda sweetens the tea a bit and adds some carbonation too. This cooler is just great as is and is sweet enough for us, but you could add more sugar to taste, and it would happily pair with any number of spirits as well. Serve it over ice with a slice of lime as a garnish, and be prepared to drink a pitcher before you know it!
 |
| Cheers! Salud! Prost! |
(Disclosure: Please know that if you make a purchase using a link on this page, I may earn a commission and I am very grateful for your support of this site. Thank you!)
Follow Me
What I’m Reading
